Asus X409FB R2.0: A Guide to Schematic + Boardview for Repairs
In the world of laptop repairs and maintenance, having access to detailed schematics and boardviews is akin to possessing a map when navigating unknown territory. For users of the Asus X409FB R2.0, this guide serves as a beacon, illuminating the path to understanding and fixing various hardware issues that might arise. The goal here is not just to provide a roadmap but to empower even the most novice users to confidently approach repairs that might otherwise seem daunting.
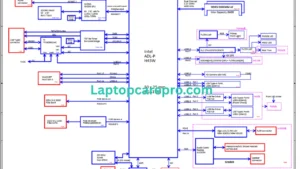
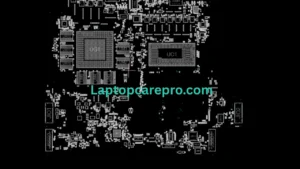
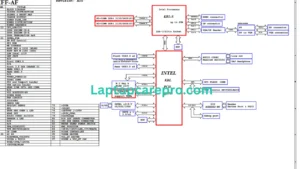
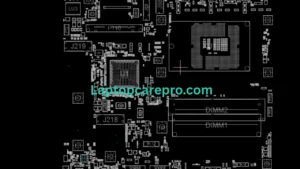
Schematics and Boardviews
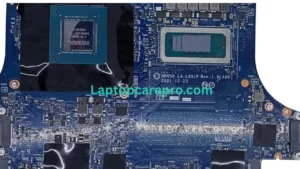
Before diving into repairs, it’s crucial to understand what schematics and boardviews are. A schematic is essentially a diagram that represents the electrical circuits of a device. It shows the components and how they’re interconnected, using symbols and lines to represent parts and connections. A boardview, on the other hand, is a visual representation of the physical layout of the motherboard. It shows where each component is located on the board, making it invaluable for tracing circuits and identifying parts.
For the Asus X409FB R2.0, both the schematic and boardview are essential tools for diagnosing and fixing hardware problems. They help in understanding how the laptop’s internal components communicate and function together, providing a clear blueprint for troubleshooting.

Conclusion
The Asus X409FB R2.0, like any sophisticated piece of technology, may encounter issues during its lifespan. However, armed with the schematic and boardview, even general users can tackle various repairs with confidence. These resources offer a clear path through the intricate world of laptop hardware, transforming daunting challenges into manageable tasks. With patience and practice, anyone can learn to navigate these blueprints, extending the life of their device and perhaps discovering a rewarding new skillset along the way.